Showing posts with label vegan friendly. Show all posts

Sunday, 21 June 2015

Oatmeal Whole Wheat Sourdough Bread

Yes, yes another bread recipe.  No, you can never have too many of these in your recipe files.  I really like the whole wheat sourdough from my previous post but this one is especially a treat with the oatmeal.  I haven't tried this bread in a my baking cloche but I am sure it would turn out deliciously.  So far, I have been making this recipe in a baking tin and slicing for sandwiches.  The bread itself is light and bouncy.  Overall it received and A++ rating from the family.

I think if you add a 1/4 cup of molasses, it would make a really nice molasses oatmeal loaf.  If you would like a few seeds, then add a handful of pumpkin and/or sunflower seeds for a seedy version. This one is also a great loaf for the freezer so don't hesitate to double the quantities and make two loaves for a quick grab later.

"'A loaf of bread,'the Walrus said, 'is what we chiefly need:
  Pepper and vinegar besides are very good indeed.'" - Lewis Carroll


  • 1 cup of warm water
  • 1/3 cup of soy milk or any other kind of milk
  • 1 Tbsp. honey or maple syrup
  • 1/2 cup of sourdough starter
  • 3/4 cup of white bread flour
  • 2 cups of whole wheat flour
  • 1 cup of rolled oats
  • 1 1/2 tsps. sea salt


In a medium sized bowl, mix water, soy milk, honey and sourdough starter.  Next, gently whisk in the white flour and rolled oats.  Finally, add the two cups of whole wheat flour and sea salt; mix with the a wooden spoon until combined.

Turn the sticky dough out onto an unfloured counter and knead with the slap and stretch method for approximately ten minutes.  After kneading, shape the dough to form a ball and return to the mixing bowl, cover with plastic wrap then set aside until the dough has doubled or more; this may take anywhere from six to eight hours.

Once doubled, turn the dough onto a floured counter and shape into a loaf.  Bake at 425F or 220C for 30-35 minutes until the loaf makes a hollow sound when tapped on the bottom.  Makes one medium sized loaf of bread.

Monday, 25 May 2015

Whole Wheat Sourdough Bread

Wow, I feel my sourdough bread journey has been epic so far!  I can't remember making so many loaves of bread in such a short period of time in my quest to successfully achieve a good sourdough loaf.  All my loaves to date have had a different amount of lift but all with very good flavour.  My early loaves were dense and chewy ~ the family loved them but I found the crust too heavy and I knew they weren't rising the way they should.

While some brag that sourdough making is very easy, I  have found that it is a delicate balance of a good sourdough starter; rising times; and kneading methods to achieve the perfect loaf.  On most of the sourdough chat forums, many have experienced the same hit and miss progress while they chased the flavour, texture, and crumb that are considered ideal in the world of sourdough bread.  I know I have far to go, but after many failures with others recipes, I have settled on this combination of my own that has produced a great flavoured sourdough with a beautiful rise of more than double and a very nice crumb.

A sourdough starter fed with pretty much all organic rye flour has given me the most consistent results.  White, whole wheat, or a combination thereof for feeding has ended with a sickly starter smelling of nail varnish.  The starter appears to need more frequent feeding with these types of flours and since I only like to feed my sourdough once or twice a week, I prefer to store my starter in the fridge; keep it to a stiff paste consistency; and feed it rye flour only when I bake or once a week ~ whichever comes first.

This loaf is made without a larger pre-ferment made the night before. I mix it up with a portion of sourdough starter ~ straight out of the fridge ~ first thing in the morning and form it into a loaf at about the 6 or 7 hour mark and then leave it for a second rise an hour or two more.  My recipe will make one large sized baguette or two smaller loaves.  Try making single batch instead of doubling the recipe so you can practice and modify your techniques.  I now only knead my bread using the slap and fold method which is easier to use with wet doughs but also incorporates more air into the dough and has resulted in a much nicer crumb.  This kneading technique was another breakthrough moment for me and I encourage you to try it.  I have provided a link at the bottom of the page should you wish to see it in action.


  • 1 1/2 cups of warm filtered water
  • 1/2 cup of warm soy milk or any milk of your choice
  • 1 Tbsp. honey, maple syrup, or natural cane sugar
  • 1 cup of sourdough starter
  • 2 1/4 cups of white bread flour
  • 2 1/4 cups whole wheat flour
  • 1 1/4 tsp. fine sea salt

In the morning mix the water, milk, honey and starter and blend well.  Next add the white flour and mix well and then finally add the remaining flour and salt.  The dough will be incredibly sticky and you will want to add more flour to it but don't.  Next, turn out the dough on  an unfloured counter and use the slap and fold method of kneading which consists of scooping up the dough on either side; flipping over and slapping it down quickly followed by stretching it toward you with your thumbs; then folding it over  on itself away from you.  Repeat these steps (see link below for more info) for about 10 minutes until the dough is smooth and elastic. Make the dough into a ball and place in a bowl, covered with plastic wrap, then set aside for 6-8 hours until the dough has doubled in size.

Dough after kneading.

When the dough has doubled, gently scrape it out of the bowl onto a lightly floured countertop.  Don't punch down as the idea is to keep as much air in the dough as possible.  Gently form the dough into a square and then fold the dough by 1/3 toward you and press down on the seam with the heel of your hand.  Repeat this fold again on the opposite side bringing the seam to the centre and press down.  Now fold the dough tightly in half and gently roll and shape as desired in a tin or in a banneton/ proofing basket.  Leave to rise again for another two to three hours.

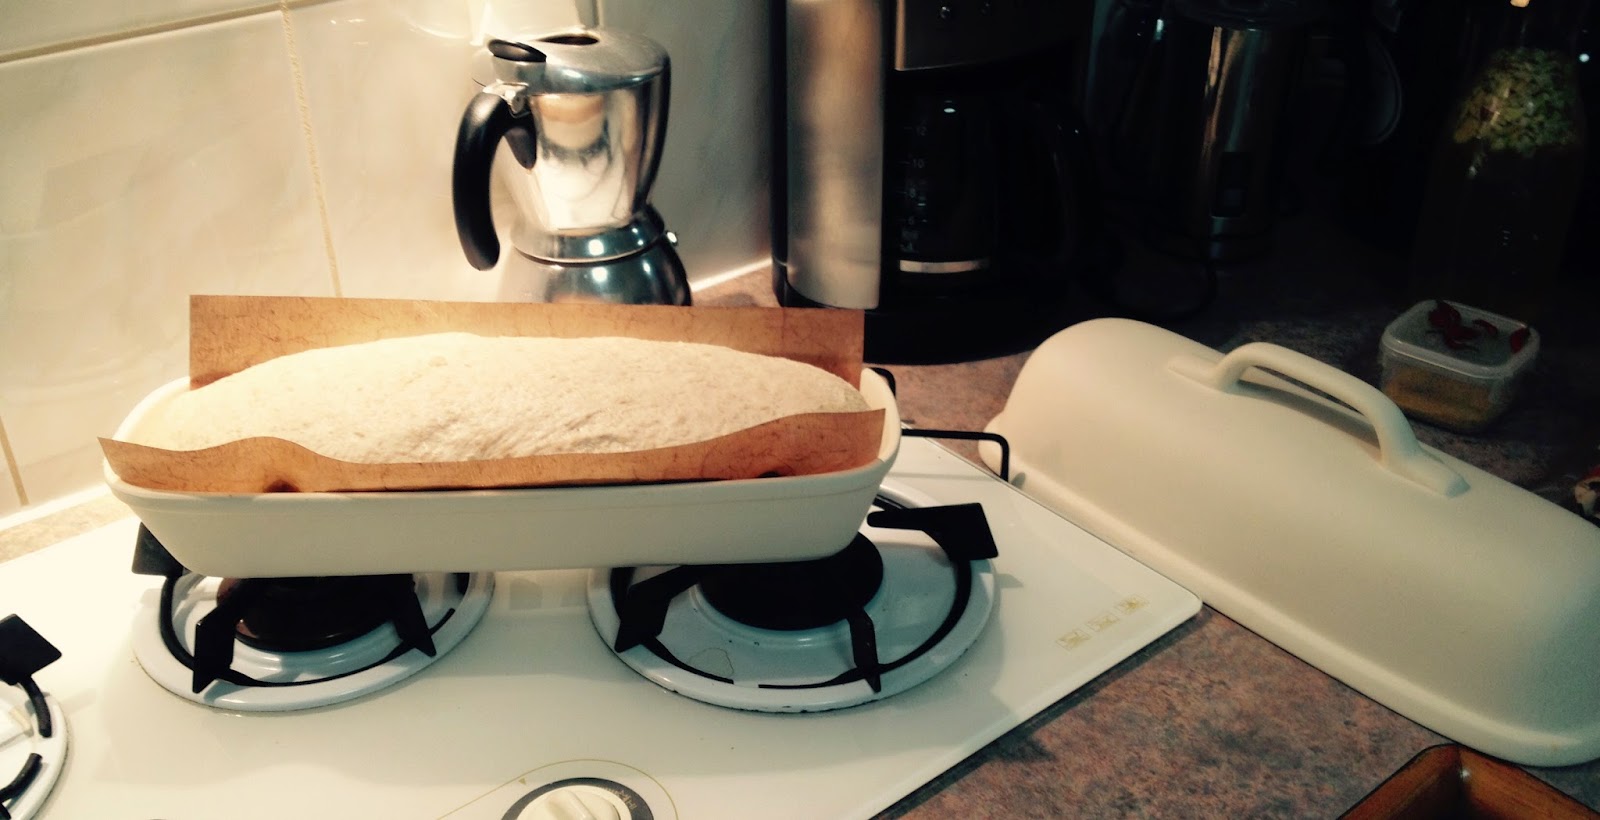
Second rise in my baking cloche.

When the dough has doubled again, bake the loaf at 425F /220C for 35-40 minutes in a bread cloche, bread tin or on a pizza stone. However you choose to bake the bread, make sure the seam side is down for baking.  The baked loaf should  make a hollow sound, when knocked on the bottom, if it is done.
Whole wheat sourdough hot out of the oven. Yes, my scoring
technique needs some work or a much sharper knife!


Monday, 18 May 2015

Sourdough Chocolate Cake

I always make chocolate cake for birthdays and occasional lunch box treats and I wanted to try a sourdough cake since I currently have three sourdough starters with which to experiment.  My birthday came and went just recently and this was the cake my kids made me for the festivities.

The process of fermenting the ingredients is reputed to breakdown the mixture in a way that makes the final baked product more easily digestible and have a lower glycemic index (GI) which is the effect food has on a person's blood glucose level.  If digestion and low GI isn't a concern of yours then using a variety of sourdough recipes is also a convenient way to use up your discarded portion of sourdough when you must feed your starter ~ so the more recipes you have on hand then the easier it is not to waste a drop.  Fermented baked goods also are supposed to have a longer counter life and stay moist for longer.

This recipe was adapted from a bunch of sourdough cake recipes floating out there in cyberspace.  King Arthur Flour has a recipe that is pretty similiar to this but makes a larger cake.  Feel free to double this for a larger sheet cake or a double layer cake.  The cake is really easy to make and stays moist and yummy for days depending on what you use for icing.  When I have made it for lunch boxes, I don't ice it at all.  In cool weather, I like a homemade coconut butter for an icing with a touch of maple syrup for a bit of sweetness; it hardens like a ganache but isn't crazy sweet and is easy on the digestion.  In hot weather, any icing is in trouble stored on the counter especially in Perth heat.


  • 1/2 cup of soy milk
  • 1 Tbsp. of apple cider vinegar
  • 1/4 cup of strong coffee
  • 1/2 cup of sourdough starter
  • 1 cup of whole wheat or white flour
  • 1 cup of natural cane sugar
  • 1/2 cup of melted coconut oil or any other oil of your choice
  • 1 tsp. vanilla
  • 1/2 tsp. salt
  • 3/4 tsp. baking soda
  • 1/3 cup plus 1 Tbsp. of Dutch processed cocoa powder, sifted
  • 1 egg or 3 Tbsps. water mixed with 1 Tbsp. of ground flax


In a medium-sized mixing  bowl, mix together the soy milk and cider vinegar.  Once the milk mixture has thickened then whisk the coffee and sourdough starter and then add the flour and mix until smooth.  Cover and set this aside from 3-8 hours.  The mixture will get somewhat elastic and rise a bit.

After fermentation

Once the mixture has suitably fermented, mix sugar, oil, egg/flax egg, salt, vanilla, cocoa powder and baking soda.  After thoroughly mixing, add to the fermented mixture and mix well.

Finished batter waiting for the oven to heat up.
See the bubbles?
Pour batter into a greased and baking paper lined 8 inch square pan or equivalent sized cake tin and bake at 350F or 180C for 35 minutes.  Allow to cool for at least 15 minutes before removing from pan to cool completely.

Friday, 15 May 2015

Spinach & Seed Crackers

I have been making my own crackers for a while after finding that I am more and more sensitive to the additives and flavourings on and in store-bought commercially made crackers.  Homemade crackers are more nutritionally dense and give you a chance to pump up the nutrients per serving.

These crackers are inspired by a combination of recipes found on the net but especially the  Chia Crispbreads found at Anja's Food 4 Thought.  I make Anja's recipe all the time but this was my interpretation of it with my favourite spices, flour, and spinach.  Leave out the spinach or simply substitute it with kale ~ either way these crackers are delish!

Spinach & Seed Crackers with a side of hummus.
  • 1/4 cup of sunflower seeds
  • 1/4 cup pumpkin seeds
  • 2 Tbsps. flax seeds, ground or whole
  • 1/4 cup chia seeds
  • 1/4 cup whole rolled oats
  • 1/4 cup of buckwheat flour
  • 1 tsp. sea salt
  • 1/2 tsp. garlic powder
  • 1/2 tsp dried thyme
  • 1/2 tsp. dried oregano
  • 1/2 tsp. sweet paprika
  • 1/4 tsp. pepper
  • 1 cup of filtered water
  • 2 Tbsps. rice bran oil or olive oil
  • 250 grams spinach, washed & pureed

In a medium sized bowl, combine all of the dry ingredients.   Add water, oil, and spinach to the dry ingredients and mix until thoroughly combined.  Set aside for 20-30 minutes and then spread on a baking sheet between two pieces of baking paper and roll out as thinly as possible.  Remove the top piece of baking paper and score into cracker shapes with a large knife before placing in preheated oven.

Bake at 350F/ 180C for 30-40 minutes or until crisp and toasted.  Baking times may vary depending on the thickness of your cracker so keep an eye on them to ensure the perfect toastiness.  Let cool for a few minutes before breaking them up either along the scored lines or freestyle when you forget to score them for baking - like me!  Store the crackers in an airtight container for up to a month.

Wednesday, 6 May 2015

Toasted Pumpkin & Squash Seeds

Well, it's officially autumn here in Australia and despite my North American brain saying it should be spring, the weather truly is significantly chillier than it has been.  With autumn comes cool weather crops for my garden and I am enjoying an abundance of kale and silverbeet ~ or swiss chard to my North American friends ~ and am hoping to see some cauliflower if the bugs don't get them first!

Seeds ready for toasting in the frying pan.
For me, autumn traditionally is a time for squash, pumpkins and pumpkin seeds.  Lucky for me, Australia supplies squash all year round which they refer to as pumpkin.  Did you know that you can eat the seeds from squash?  Most people I know just chuck these gems in the garbage when they are preparing their squash/ pumpkin for dinner.  Our family loves to toast them and our only problem is that there are never enough seeds in the pumpkin to keep up with our appetite!

The next time you scoop out a squash or pumpkin, save the seeds.  Simply separate the 'guts' of the pumpkin/squash from the seeds, give the seeds a rinse and spread out on a piece of baking paper to dry a bit.  Once dry, dump the seeds still in their shell in a small frying pan with about 1 teaspoon of coconut oil and toast with a pinch of salt until golden brown. Sometimes I add a pinch of homemade seasoning to finish them off.

Pumpkin seeds, especially with their shell, are an excellent source of zinc and are very high in fibre so make so make an effort to give this snack a try!


Toasted spaghetti squash seeds.


Pumpkin Seed or Popcorn Seasoning

  • 1 1/2 Tbsps. nutritional yeast
  • 1 tsp. sweet paprika
  • 1/4- 1/2 tsp. cayenne pepper
  • 1/2 tsp. onion powder or dried onion flakes
  • 1/2 tsp. garlic powder
  • 1/2 tsp. salt


In a mini food processor, combine all the ingredients and blend until finely ground.  Store in an airtight container for up to a year.

Enjoy!

Monday, 4 May 2015

Spinach & Seed Cracker Crisps

I started making my own crackers about a year ago in my quest to reduce refined and processed products.  I was looking to make something that packed a big nutritional punch and got to work researching a homemade cracker that tasted great, was pretty easy to put together and tasted yummy. This recipe was inspired numerous crispbread seed cracker recipes that are out on the net.  I find everyone has their favourite combination of seeds, seasonings and flour for these crackers so this is my version with my favourite spice combination.  The recipe can be made with pureed spinach, kale or completely without either.  If you want to leave out the spinach then simply leave it out and proceed with the cracker recipe with the remaining ingredients.  Besan (chickpea), rye, and whole wheat flour also make a great substitute in place of the buckwheat flour. I make the recipe both with and without spinach and they are both equally yummy!


  • 1/4 cup of sunflower seeds
  • 1/4 cup of pumpkin seeds
  • 2 Tbsps. flax seeds, ground or whole
  • 1/4 cup chia seeds
  • 1/4 cup of whole rolled oats
  • 1/4 cup of buckwheat flour
  • 1 tsp sea salt
  • 1/2 tsp. garlic powder
  • 1/2 tsp. thyme
  • 1/2 tsp. oregano
  • 1/2 tsp. sweet paprika
  • 1/4 tsp. ground pepper
  • 2 Tbsps. rice bran oil or olive oil
  • 1 cup of water
  • 250 grams of fresh spinach, pureed

In a medium-sized bowl, combine all of the dry ingredients.  Add water, oil and spinach to the dry ingredients and mix until thoroughly combined.  Spread on a baking sheet between two pieces of baking paper and roll out as thinly as possible.  Remove the top piece of baking paper and score into cracker shapes with a large knife before placing in preheated oven.

Bake at 350F/ 180C for 35-45 minutes or until crisp and toasted.  Baking times may vary depending on the thickness of your cracker so keep an eye on them to ensure the perfect toastiness.  Let cool for a few minutes before breaking them up either along the scored lines or freestyle when you forget to score them for baking - like me!  Store the crackers in an airtight container for up to a month.

Monday, 27 April 2015

Sourdough Coastal Cracker Crisps

After living for two years in Vancouver, British Columbia, I came away with a love for Raincoast Crisps made by Lesley Stowe Fine Foods.  They are so delicious and go well with savory dips and spreads like hummous or baba ganoush.  I had never heard of them before until I hit the West Coast of Canada and have never seen them since moving to Australia.

I don't buy commercially prepared crackers anymore.  After some uncomfortable reactions from the seasonings and preservatives in store-bought crackers,  I began to make my own crackers so I know what is in them.  It isn't really a big deal to make your own crackers.  You kind of develop a taste for homemade and I find they fill you up faster.  There are a few versions of Raincoast Crisp recipes on the net and I have adapted this recipe from a compilation of these.

If you don't want to ferment the cracker crisps for easier digestion and a lower GI rating then leave out the sourdough starter and mix to bake immediately.  It think the fermentation process is worth it and it is easy to mix the batter before bed, let it stand overnight, and then bake in the morning.  I mixed mine in the morning and then left the batter to ferment for the day before baking, slicing and then toasting in the evening.

Please give these cracker crisps a try because they are so delicious!


  • 1 cup soy milk
  • 1 1/2 Tbsps. apple cider vinegar
  • 1/4 cup of honey or maple syrup
  • 1/2 cup of sourdough starter
  • 1 cup whole wheat flour
  • 1 tsp. baking soda
  • 1/2 tsp. salt
  • 1/2 cup of dried cranberries or raisins
  • 1/4 cup of pumpkin seeds
  • 1/4 cup of sunflower seeds
  • 1/4 cup of hulled millet
  • 1/4 cup ground flax seed
  • 1 Tbsp. of fresh rosemary, chopped

In a medium sized mixing bowl, gently whisk soy milk and apple cider vinegar to achieve a thickened sour milk.  When mixture has thickened add honey and whisk to combine.  Next whisk in 1/2 cup of sourdough starter and then the whole wheat flour.  Finally add the last of the flour, baking soda, and salt; stir.

The batter is fairly runny at this stage.  Next add your favourite dried fruit -I prefer cranberries but use whatever you like; pumpkin and sunflower seeds; flax seed, hulled millet, and rosemary.  Stir until the ingredients are thoroughly mixed.

Coastal Crisp batter.
Coastal Crisp batter after 8 hours.

Set aside the batter for about 8 hours and then pour into a greased loaf tin and bake at 350F degrees or 180C for 35-40 minutes depending on your oven.  Cool for about 10 minutes and then remove from tin.  Allow the loaf to cool completely; you can expedite this by placing in the fridge.

Batter in a bread tin and left to
raise for an additional hour
After baking.

Once the loaf is cool to cold, cut into thin slices and further toast/ dehydrate on a cookie sheet in a preheated (350F degrees or 180F) and then turned off oven or place in food dehydrator to achieve a crispy cracker.  Store in an airtight container for up to 2 months.  Makes about 45 cracker crisps depending on the shape and size of your loaf pan.

Friday, 24 April 2015

Sourdough English Muffins

Sourdough everything is still on the brain here in my house.  After a couple of loaves of mediocre sourdough bread, I decided to scale back and rethink my sourdough strategy.  So far, I have had amazing sourdough flavour in all things sourdough but the rise and crumb of my loaves and cake have been a little hit and miss.

In a quest to improve my baking endeavors, I decided to buy some organic rye flour to super boost the friendly bacteria in the starter and moved it into permanently into the fridge.  Organic rye flour is reputed to be the best thing for sourdough feeding and the starter responded to the switch up from whole wheat flour to rye in a very positive way.  Because I intended to take a sourdough break, I fed the starter with rye flour but added less water to make it much thicker and borderline paste in an effort to go longer until my next feed.

After about two weeks or a little less in the fridge, I decided to feed my sourdough beast and use the discarded sourdough starter portion in my usual yeast bread recipe.  I followed my normal bread recipe and simply exchanged a half cup portion of flour with a half cup of sourdough starter.  I usually leave my yeast bread dough on the counter to double for two to four hours but surprisingly the dough doubled within an hour.  The sourdough starter seemed to super boost my bread with the end result being an incredibly light and delicious loaf of bread minus the sour flavour - as it didn't have time to develop.

Sticky dough
The key to sourdough is to have a powerfully active sourdough starter and a very wet and sticky dough. Just mix your dough so that all the ingredients are combined but ensure the dough is way too sticky to handle.  The long rising time will deepen the flavour and allow the dough to become more manageable and elastic without kneading.  I only kneaded this dough with a tiny bit of flour for a few seconds before dividing and shaping so it is really easy.  

~ Please take note:  to identify if your sourdough starter is active enough, it should be full of bubbles and have doubled in its container before using.  When you spoon the starter out to use, it should basically deflate. These are good signs that your starter is very active.  The starter should smell very sour but not like nail varnish.  If it does smell strongly of alcohol or of varnish, discard at least half to two thirds and feed with flour and water to form a wet paste and place back in fridge for at least a week while it recovers then evaluate again. ~

The dough after an 8 hour rise.
With my confidence boosted that my sourdough starter, Beastie, was showing signs of being super charged up; I fed him some more rye flour and rested him for a couple of days in the fridge and then pulled him out for an attempt at sourdough English muffins.  My first batch was halved - just in case I failed.  I began by mixing the dough in the morning and covered with plastic wrap and left in a warm spot until suppertime.  By this time, the dough had doubled so I dumped out the very sticky dough, kneaded it a few times with a bit of flour until I could gently handle it.  Finally, I rolled it in a log and sliced into about 10 pieces.  I shaped these up and then let rise on my baking tray until double and after a couple of hours, baked.  These English muffins were so light and so perfectly risen with a gentle sour taste, that I jumped for joy.  Not a speck of yeast was used to achieve greatness and it is this recipe that I share with you today.
The English Muffins after a two - three hour rise after shaping.

Sourdough English Muffins after baking.

I have now completed a few batches of multi-grain sourdough English muffins.  This recipe produces light, tangy and perfect English muffins that are delicious with your favourite topping.

They freeze exceptionally well and I guarantee they won't last long on the counter as they will get gobbled up for breakfast, lunch or snacks.  My kids like them instead of buns for a sandwich and they are awesome toasted too.   Enjoy!


  • 1 cup active sourdough starter
  • 1 cup warm filtered water
  • 1 cup soy milk or any milk of your choosing
  • 2 Tbsps. honey or maple syrup
  • 1/4 cup melted coconut oil or your choice of oil
  • 2 1/2 cups of white baking flour
  • 2 1/2 cups of multi-grain or whole wheat flour
  • 1 tsp. salt

In a medium sized bowl, combine sourdough starter, water, milk, honey and oil;  whisk gently until combined.  Next stir in the white flour.  Then slowly add the last 2 1/2 cups of multi-grain flour and salt ensuring that the dough is very wet and sticky.  Hold back on the last 1/4 cup of flour if it is starting to feel like it is getting too dry.  Whole wheat flour tends to absorb a bit more liquid so so be prepared to adjust the flour by a small amount if it is a bit dryer than you want.  Sourdough dough likes to be very sticky.

Now, cover the bowl with plastic wrap and leave it in a sheltered spot on the counter and let it rise until double for about 8 hours.

Once dough has doubled, punch down and scrape the dough out of the bowl onto a floured counter.  With a sprinkle of flour, knead a few times until dough is a bit more manageable.  This dough should still be very wobbly but more elastic.  Flour and roll out to about 1/2 inch thick and cut out in circles about 3 inches in diameter.  Place on a cookie sheet lined with baking paper to set aside for a second rise until double.  This may take up to three hours.  When ready, bake at 400 degrees Fahrenheit or 200 degrees Celsius for ten minutes.  Makes 20-24 English muffins.

I mixed in the morning, punched down dough at supper time and shaped for second rise to bake at about mid-evening which produced a very mild sourdough flavour.